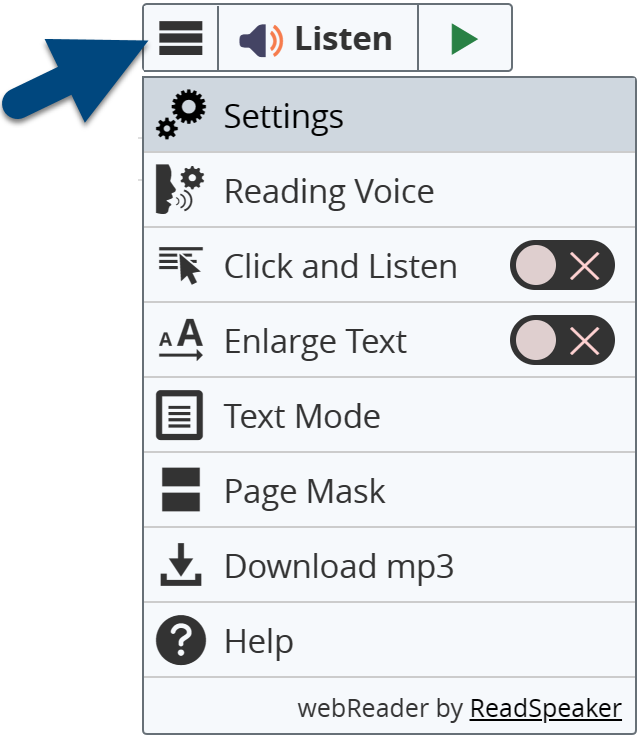
ReadSpeaker webReader is a player that allows you to stream your lessons within Moodle. It looks like a button with the word "Listen" and an arrow pointing to the right.

When you expand the bar, you will see additional features. You may find the following YouTube Playlist beneficial.
After the ReadSpeaker tool is activated, the controls: Listen, Pause, Stop, Skip Backward 5 seconds, Skip Forward 5 seconds, Volume, Reading Speed, and Close.
- Using your mouse, you can move the toolbar by left clicking and holding. Release the button to leave the tool bar.

Tool Name |
Tool Image | Tool Video | Tool Description |
|---|---|---|---|
Open / Close |
 |
Clicking on the Open or Close Lower Toolbar tool toggles between showing or not showing the lower toolbar. | |
Listen |
 |
Click the Listen tool to begin listening from the top of the page to the bottom. You can also highlight a portion of the page and then click on the Listen tool to hear just the highlighted portion. |
|
Pause |
 |
Click the Pause tool to pause the reading, to restart the reading from the paused point, click the Listen button. | |
Replay |
 |
The Replay tool will replay the passage that was previously played. This can be a whole file or highlighted section. | |
Stop |
 |
Click the Stop tool to end the reading. Restarting the reading after clicking stop requires clicking the Listen button. | |
Skip Backward 5-seconds |
 |
To re-listen to a part of a page, click the Skip Backward 5-seconds tool. It can be click multiple times. | |
Skip Forward 5-seconds |
 |
To move forward quickly through a page, click the Skip Forward 5-seconds tool. It can be clicked multiple times. | |
Volume |
 |
To adjust the volume, click on the Volume tool. Sliding the marker up increases the column and sliding it down will decrease the sound. | |
Reading Speed |
 |
To adjust the reading speed, click on the Reading Speed tool. Sliding the marker up increases the reading speed, and down decreases the reading speed. In the Settings and Text Tools, the reading speed scale is horizontal instead of vertical. Sliding the marker to the right increases the reading speed, and the left decreases the reading speed. You can see your reading speed number in a black box beside or below the scale. Second language learners may find the reading speed of 85 to 95 helpful. Students going into careers where they will have information relayed quickly will want to practice listening faster until they can listen at the reading speed of 200. | |
Close Player |
 |
To collapse the player, click on the Close Player button |
Did you notice the set of three lines (often referred to as the hamburger button) to the left of the Listen button? When you click on the set of lines, a lower toolbar expands. The Lower toolbar has various accessibility tools on it. Let's take a look at the lower toolbar together.

Tool Name |
Tool Image |
Tool Video |
Tool Description |
|---|---|---|---|
Settings |
  |
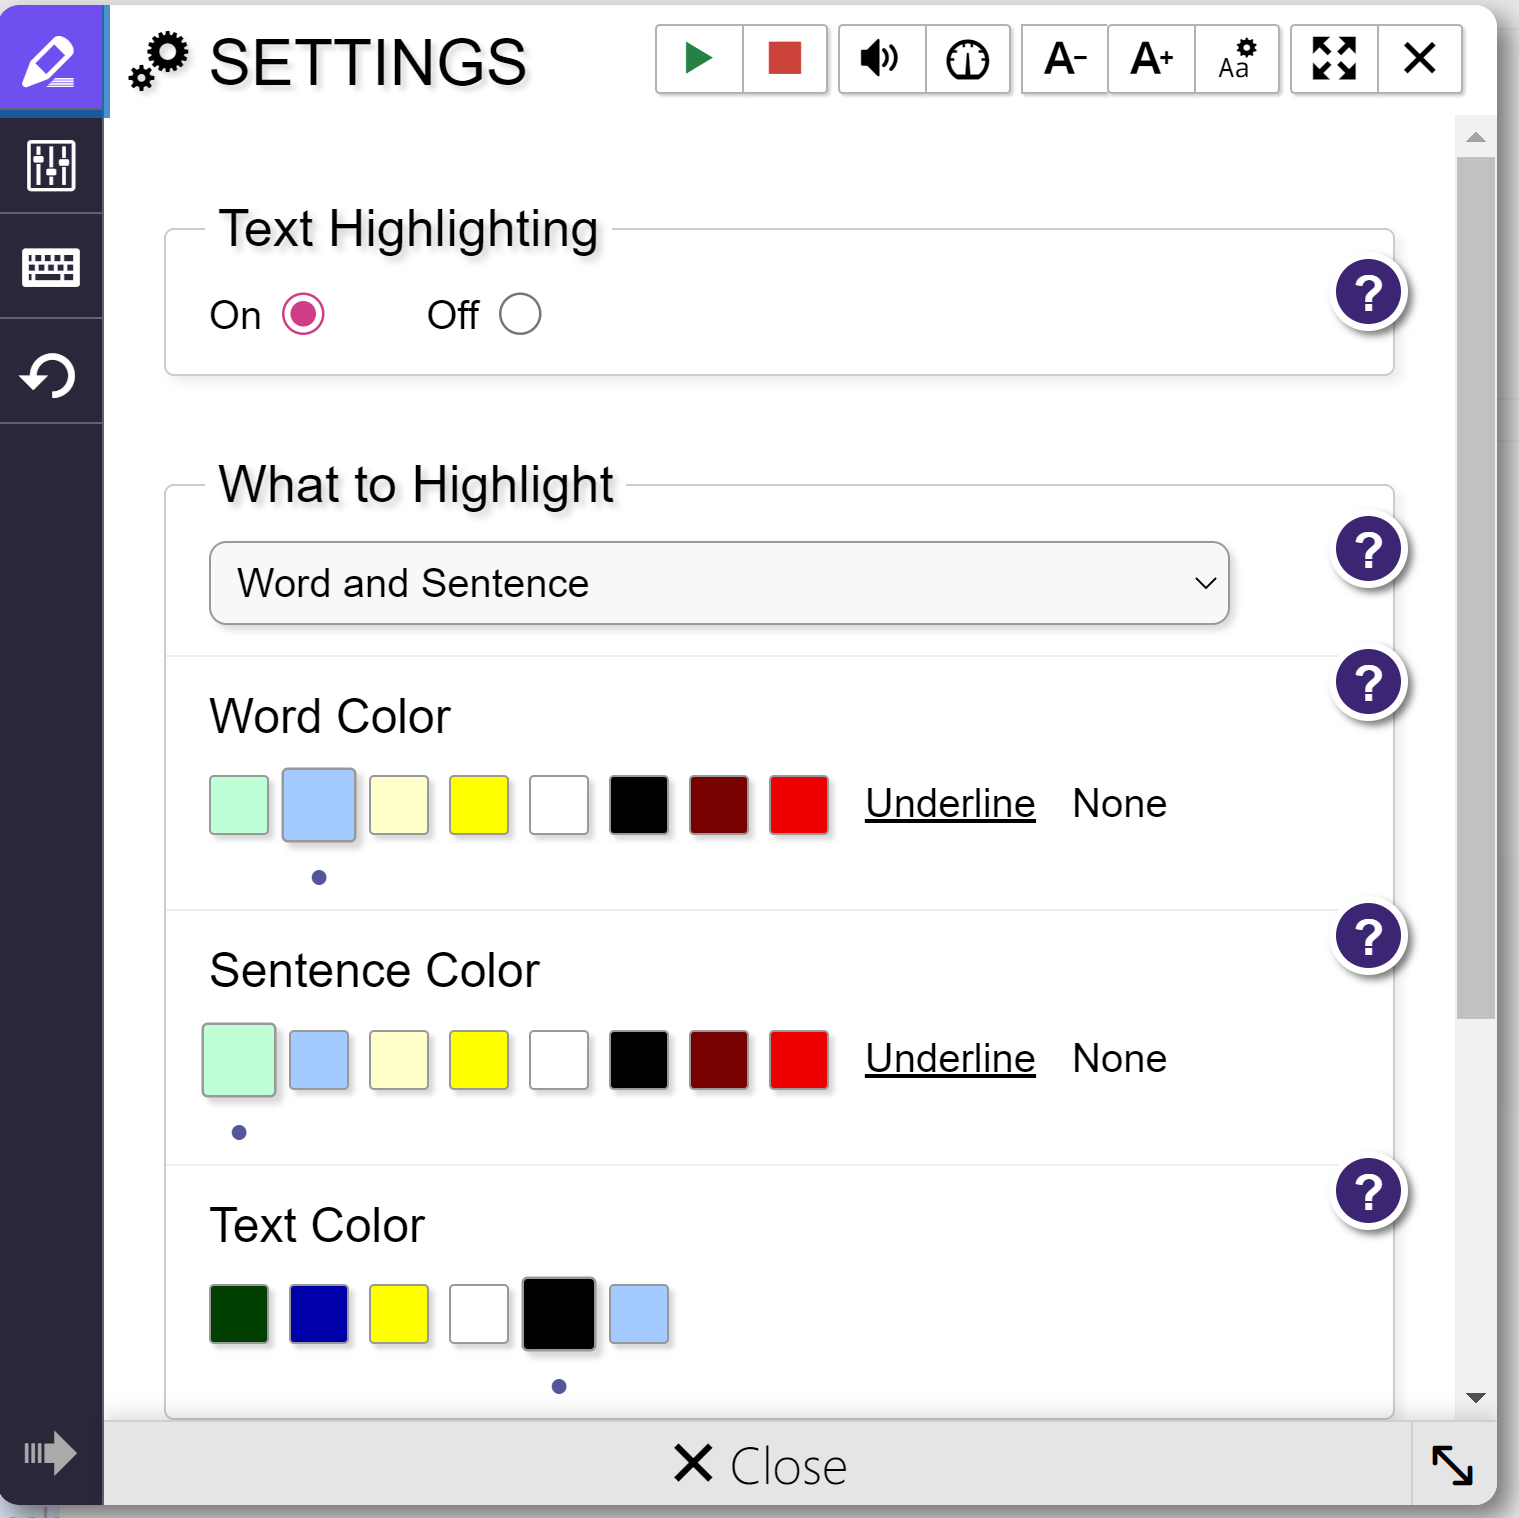
The Settings tool has many pieces to it. Across the top of the Settings menu are listen commands, increase and reduce the font size, volume, reading speeds, and text settings. The main page has the reading highlight settings for the word, sentence, and text colors, automatic scrolling, and pop-up menu settings. The lower image is the highlighting settings. Select the highlighting colors that are best for you. These are device and browser-specific settings. | |
Text Settings |
 |
The Text Mode settings icon has a gear with a capital and lowercase "A" below it. The text settings include font size, font, and background/text color settings. Adjustments made to the settings are device-specific and stored in the device's cookies. The second image shows the various settings in text mode. | |
Reading Language |
 |
You should see both a male and a female US English voice. If your institution has purchased additional languages, you will see all of them when you click on Reading Language. You can change to the new language or voice by clicking on the Reading Language tool and selecting from the list. The Reading Language tool is not a translation tool. Always match the document language to the voice language. | |
Click and Listen |
 |
The Click and Listen tool allows you to read selected sections of your material without highlighting. Toggle the switch on, showing a check in the toggle switch area. Click on the area that you want to read and listen to. Once you are finished, turn the Click and Listen tool off by toggling the switch to the opposite position. You will see an "X" in the toggle switch area. | |
Enlarge Text |
 |
The Enlarged Text tool is excellent for focusing on your material and learning material in a challenging course. To turn on the tool, move the toggle switch so that you see a check. You can either click Listen to have the file read from top to bottom, highlight a portion of the file, or click Listen to hear just that portion read to you. At the bottom of the page, you will see the text enlarged (customizable) and highlighted as it is read. The highlighted enlarged text gives you a direct focus on the part being read, removing distractions from your line of sight, and providing the information in smaller visual portions, which help to increase the retention of the material. Because the material is shown in smaller parts, you can grasp the small details, which may make your challenging course easier. You also have player controls of Play, Pause, and Stop on this highlighted window. To turn off the Enlarged Text tool, you need to click on the Enlarged Text toggle switch again to see an "X" in the toggle switch area. | |
Form Reading |
 |
The Form Reading tool is used for filling in fields. When you toggle it on (showing a check beside the toggle switch), you can click in the field where you typed your answer. webReader will then read the response you typed out loud. This will help you ensure that you typed what you thought. Toggle the switch to the off position (showing an "X" beside the toggle switch) when you have completed and submitted your form. | |
Text Mode |
 |
Text Mode is a distraction-free environment to view your file. All material is shifted to the left, and only alt-tagged images are included. The page has a "cleaner" look. You can also adjust the font, font size, background text colors, and text spacing for the page. Like the Settings tool, you have the listen commands across the Text Mode window, increase and decrease font size, volume, reading speed, and text settings. This navigation bar on all text boxes allows you to make the changes quickly so that you do not have to navigate back to the Settings tool to make changes. | |
Page Mask |
 |
The Page Mask tool shades the material above and below a bright, customizable window. You can scroll the Page Mask or the page. Clicking the plus ("+") on the bright window increases the height of the window, and clicking the minus ("-") decreases the window height. Clicking the "X" turns off the Page Mask tool. The Page Mask tool is the electronic version of a sheet of paper with an open stripe pushed up or down on a paper text. | |
Download mp3 |
 |
When you click on the Download mp3 tool, you see a window where you must agree not to share the file and that the file will be for personal use only. Be sure to read this agreement. After agreeing, a window will pop up, allowing you to decide where to save and what to name the file. We suggest that you name the file the same as the lesson. Place underscores or hyphens between words to make them easier to locate later. Once the file is downloaded, you can transfer it to your mp3 device using the usual methods (iTunes, drag-and-drop, etc.) | |
Help |
 |
The Help tool is a file with a wealth of information about all the tools in webReader. Within the file, you will also find how to set up keyboard navigation and the various access keys for each tool. |
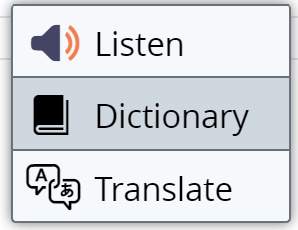
When you highlight a section of the text, you will see a pop-up menu. It looks like the following image:

Tool Name |
Tool Image |
Tool Video |
Tool Description |
|---|---|---|---|
Listen |
 |
You will see the pop-up menu when you highlight a portion of your file. Clicking Listen from the pop-up menu will start the reading of this portion. The Pause, Play and Stop tools are located on the main player that expands when you click the Listen tool from the pop-up menu. | |
Dictionary |
 |
The Dictionary tool uses an online dictionary. Begin by highlighting a word and clicking on the Dictionary tool. The first time you use the tool, you will be given a notice that essentially says the Dictionary tool is pulling from other sources. Click agree after reading the message. The definition and an example are returned in the pop-up window. If a word can be used as more than one part of speech, then the definitions and examples will be provided with each part of speech. At the top of the pop-up window, you will see the same tools on the Settings and Text Mode navigation bars.
If you cannot find your word in the Dictionary, try leaving off the suffix such as -ly, -s, -ed, -er, -ing, etc., and try again. Dropping a suffix only applies to words where the root word's spelling is unchanged by adding the suffix. Using the Dictionary tool is a great way to increase your vocabulary. |
|
Translate |
 |
The Translate tool allows you to translate a word or phrase into another language. It is not intended to be used for translating a complete document because the grammatical structure of sentences differs for many languages. To use the Translate tool, highlight a word or phrase, click Translate, and select your language. You will see a pop-up window with an agreement at the top that indicates that we are using Google Translate or DeepL (depending on which translation tool your institution chose), a word-by-word translation. Click agree after reading the message. You will see the translation in the pop-up window. At the top of the pop-up window, you will see the same tools on the Settings and Text Mode navigation bars. |